

Since that unhappy day when Badger sailed out of my life, I have missed sailing with junk rig. I am, I suspect, the world’s laziest sailor. I enjoy the way of a boat under sail; manoeuvring the boat in close quarters; even steering when day sailing, as long as the boat is going more or less in the right direction and there’s lots to look at. What I don’t enjoy is fiddling with bits of string or physically handling sails. I get frightened on the foredeck and a flogging sail turns my knees to jelly. In truth, I’m not really much of a sailor. My pleasure comes from pilotage, from living on board, from ‘nice’ maintenance tasks such as varnishing or whipping a rope’s end, from sitting in the cockpit with the self-steering nodding away and the boat bounding along in the right direction while I do nothing but enjoy it. I fear readers will be very disappointed to hear this, but it will explain why someone such as myself, who prefers sloth to activity and is far from being even a competent woodworker would go to so much trouble – and not a little expense – to transform a ‘perfectly good’ Bermudian sloop into a little junk.
Even during my first small adventure with Joshua I had condemned her rig and was contemplating the alternative. I had Practical Junk Rig, written by Jock McLeod and Blondie Hasler and considered ‘The Bible’ in the world of junks, and this I studied. I generally kept the idea to myself, knowing what most people would think, but I mentioned it to a friend who is also a junkie. (An apt word as proponents of the rig tend to get addicted to it). David although in N Island (NZ) at the time, was eager to help and it’s amazing what can be done with a little email and a lot of text messaging. I sent David a drawing of the hull and rig. Text messages followed: ‘How far stmhd 2 fwd bnk blkhd?’ “How far can mst stp b frm bnk blkhd?’ While David pondered, I, with pencil, rule and eraser (much of the latter), toiled away at my drawings. But one morning I opened my Inbox and there was a PDF document with a perfectly executed sail plan. (David understands CAD programs.)

I had intended to ‘do everything myself’, but am not so foolish as to turn down the best of help for the worst of reasons.
Now it so happened that David was visiting another junkie, Paul, who is in the midst of refitting a 32 ft steel ketch he built in S Africa. She was, of course, to be junk rigged. Their joint enthusiasm led to momentary madness when Paul e-mailed me saying that he had a good sewing machine, a large table and some ‘spare’ sailcloth, which should be about enough for me to build the sail that David had designed. What could I say but ‘thank you’ and from toying with a long-term plan, I was suddenly committed to an imminent project.
Now it so happened that David was visiting another junkie, Paul, who is in the midst of refitting a 32 ft steel ketch he built in S Africa. She was, of course, to be junk rigged. Their joint enthusiasm led to momentary madness when Paul e-mailed me saying that he had a good sewing machine, a large table and some ‘spare’ sailcloth, which should be about enough for me to build the sail that David had designed. What could I say but ‘thank you’ and from toying with a long-term plan, I was suddenly committed to an imminent project.
Consoling myself with the thought that I would be able to sell the extant rig for what a new one should cost, a few weeks later, I packed a bag and got a cheap flight to Auckland. Paul and his wife met me and we returned to their flat behind a factory, alongside which lay La Chica, under plastic and obviously in the middle of major work.
Paul has a superb workshop in the factory, which included the large table on which I could lay out fabric. However, the first hitch in my project came when I realised that the table was insufficiently long for me to cut full length panels from the sailcloth (in fact a polyester awning material, called Odyssey). There was not going to be a lot of fabric to spare, so I wanted to waste as little as possible. David had by now left for Oz, Paul was busy with work and boat renovations so I had to try and sort this out myself. I concluded that the best thing would be to ‘make the material’ to make the panels. Paul reckoned he could knock out patterns for this, using his computer, to minimise waste. This he did and I got out the scissors and started cutting and sewing. This was fairly straightforward and now that I was handling the material, I could start planning the sailmaking itself.
I am not good at planning too many steps at a time when making things. This occasionally results in my having got so far and being unable to see where to go next. However, I am stuck with the brain I was given, so have to live with it. So having started cutting material, I still didn’t know exactly how I was going to get to the end result: a sail. But once the material for the panels had been sewn together, I could begin to see the whole process. The latest thinking, in the junk rig world, is that it is both possible and beneficial to put camber in the sail itself, thus avoiding the weaknesses that have always plagued the flexible battens that people have used towards this goal. But being junk rig, things are not as you might expect: instead of the camber being along the height of the sail, it is along its length, between the battens. There are several ways of doing this: I used a method whereby one cuts out lens shaped pieces of fabric and sews these to the straight edges of the generally-assymetric panels.
I am not good at planning too many steps at a time when making things. This occasionally results in my having got so far and being unable to see where to go next. However, I am stuck with the brain I was given, so have to live with it. So having started cutting material, I still didn’t know exactly how I was going to get to the end result: a sail. But once the material for the panels had been sewn together, I could begin to see the whole process. The latest thinking, in the junk rig world, is that it is both possible and beneficial to put camber in the sail itself, thus avoiding the weaknesses that have always plagued the flexible battens that people have used towards this goal. But being junk rig, things are not as you might expect: instead of the camber being along the height of the sail, it is along its length, between the battens. There are several ways of doing this: I used a method whereby one cuts out lens shaped pieces of fabric and sews these to the straight edges of the generally-assymetric panels.

The lenses, which decrease in size as they go up the sail, required some fairly basic lofting techniques. The panels were more demanding, so I started with the lenses to get the feel of things.

This seemed to go well, so I started to loft and cut the panels themselves. To do this I needed to measure the diagonals and as the sail is some 5 metres long from leach to luff, this was not straightforward on my own. However, I found a couple of lead weights and with these weighed down one end of the tape measure while moving the other end.

As I cut them, I marked top, bottom luff and leach and, for good measure, such things as ‘to lens no 4). I can be remarkably stupid at sewing up a simple frock, so I tried everything I could think of to make sure nothing went wrong with the assembly. Odyssey is coated on one side, so that one side is shiny and the other matt: this also had to be taken into account. In fact I only had to undo one seam: a batten pocket that I did sew on wrong side up. All the graffiti paid off. The final cutting job was the batten pockets.
Once my pile of pieces was cut out I was ready to begin sewing. Although I have been involved in making junk sails before, my role has invariably been that of assistant, but when I started sewing I was amazed by how much had sunk in. I started from the top, because these panels were smaller and easier to handle. The plan was to sew panel to lens, sew on next panel and then to sew a batten pocket over middle of the lens. This way I was always working on (more or less) the edge of the sail. It all went surprisingly smoothly, although my stitching was far from straight or regular. For several panels I rolled the sail that I had already made, into a tube, thinking this would be easier to push along the table, but it was reluctant to slide. Eventually I just shoved mountains of material back and forth. This did allow the machine’s foot to do its thing and feed the fabric through, but it was still far from perfect. However, the stitching does the job it is meant to do, even if its not exactly of professional quality. Rough chipboard is rather different from the varnished floor of the average sail loft.

The foot and head of the sail had boltrope attached to fit in the slots on the yard and boom; I sewed a webbing boltrope on the luff and leach. Then I reinforced the corners and cut off all the long ends. The sail was finished. I called Paul in to admire my handiwork and we hoisted it up on its boom: it looked almost like a sail.

I should have added eyes above and below each batten in order to lace them together should a batten break or a panel tear, but I had none to hand and put it off for another day.
Back in Nelson I started thinking about the mast. I investigated timber, new and second-hand, alloy poles of various shapes and sizes and even fibreglass. A neighbour, clearing out under his house, presented me with a broken Douglas fir mast and a large baulk of the same timber, about a metre and half long. This gift eventually decided me to go for a ‘hybrid’ mast, with alloy base and wooden top – not a revolutionary idea, but one suggested in Practical Junk Rig. The longest length of 152 mm tubing I could buy was 6 m. I needed to end up with a 9.5 m mast and the topmast would need a bury of some 400 mm. I reckoned I had just about enough wood.
Back in Nelson I started thinking about the mast. I investigated timber, new and second-hand, alloy poles of various shapes and sizes and even fibreglass. A neighbour, clearing out under his house, presented me with a broken Douglas fir mast and a large baulk of the same timber, about a metre and half long. This gift eventually decided me to go for a ‘hybrid’ mast, with alloy base and wooden top – not a revolutionary idea, but one suggested in Practical Junk Rig. The longest length of 152 mm tubing I could buy was 6 m. I needed to end up with a 9.5 m mast and the topmast would need a bury of some 400 mm. I reckoned I had just about enough wood.
The local boatyard kindly let me use their big shed to build in and I got them to cut the old timber into more-or-less the right size. I went over each piece with infinite care because Danny had made it quite clear that if he damaged his saw blade or planer, I would have to pay for the resharpening, or replacement of a tooth. Once sawn, we were all impressed with the quality of the wood.
I scarfed the shorter lengths of wood together and glued them into two long lengths. These were then glued to the two lengths I had had sawn from the old mast.

The next stage was to pull out the screws, fill in the holes and then sand the whole thing down. Next I had to shape the mast, which was a barely-tapered square section. Because of the way I had put it together, there was plenty of wood at the top, so I could remove weight up here and create a pleasing taper. Then I worked down the mast planing off more wood as I turned the sharp edges into well-rounded corners, ensuring that there was still adequate thickness of wood to maintain the integrity of the spar.
I now had a square-based mast and a round hole to put it in. So I filled out around the base to create an almost-circular section. I fitted pieces of wood roughly to size and then filled in the gaps with thickened epoxy. The whole butt was then sanded. I had bought an offcut of alloy tubing of similar dimensions to my mast and used this to ensure a good fit.
I now had a square-based mast and a round hole to put it in. So I filled out around the base to create an almost-circular section. I fitted pieces of wood roughly to size and then filled in the gaps with thickened epoxy. The whole butt was then sanded. I had bought an offcut of alloy tubing of similar dimensions to my mast and used this to ensure a good fit.

I then filled screw holes and various imperfections in the second-hand timber and coated the glass with epoxy. The old wood soaked up plenty. Once it was well-coated, I sanded it all down and then covered it with a layer of glass and epoxy. This makes a very hard finish and should be impervious to the sawing back and forth of the batten parrels.

The next stage was to make a shoulder for the topmast, so that it would rest securely on the alloy tube. Offcuts created when I scarfed the wood came in useful here. This was then planed, filled, sanded and glassed.

I put a couple of wires up the mast: one for a tricolour light and one for an all-round steaming lightthen painted the mast with pigmented epoxy, slightly thickened with silica, as an undercoat.
Instead of making a masthead fitting, I glued some large hex bolts into the top, head down (I had left extra wood here for this purpose) and a large eyebolt for the halliard. Stainless steel eyes were screwed to the bolts. A certain amount of tooth-sucking from various parties has resulted from this, with dire warnings of fatigue because the eyes are not meant to be used in this way. But they’re very big! Finally, I used the said eyes to suspend the mast while I painted it my favourite shade of turquoise, which colour I intend to use on my boat when I repaint her.
Instead of making a masthead fitting, I glued some large hex bolts into the top, head down (I had left extra wood here for this purpose) and a large eyebolt for the halliard. Stainless steel eyes were screwed to the bolts. A certain amount of tooth-sucking from various parties has resulted from this, with dire warnings of fatigue because the eyes are not meant to be used in this way. But they’re very big! Finally, I used the said eyes to suspend the mast while I painted it my favourite shade of turquoise, which colour I intend to use on my boat when I repaint her.

While waiting for glue to dry, etc, I had prepared the old rig to be removed. New Zealand yacht clubs and marinas rarely have their own mast cranes and masts are left in boats for decades at a time, apparently without problem. The usual route for me to have taken would have been to hire a crane, but this was going to cost several hundred dollars and I don’t have many. Instead I consulted with my friend Dick, on Irene, one of the most competent sailors it has been my good fortune to meet. Brought up around smacks and Thames barges, Dick knows how to use low cunning instead of raw power. We arranged to bring Joshua alongside his Irene – a large gaff ketch – and use her gear for pulling out the mast. My friend Ulla assisted, Pat took photos and provided tea and the whole thing went like clockwork, as anyone who knows Dick would have anticipated.

That done, I now had to reinforce the deck, make a large hole in it and line said hole with substantial partners. I then had to fit a mast step at the correct angle and distance so that the mast would go in as planned, with a forward rake of 6º. This rake is for two reasons: the first was to keep the mast out of my bed, the second to assist the sail to hang out when running in very light winds, in a slop. I tend to emphasise the latter reason when asked about my forward leaning mast!
Had I made the mast and partners out of wood, I should have ended up with overly large structures, so I bit the bullet and asked a local metalworker to make them for me out of stainless steel. Galvanised would have been as good, but they would have to be sent to Christchurch to be galvanised (assuming the works had survived the earthquakes) which I reckoned would cost almost as much as the extra expense of stainless. When Bob presented me with the heart-stopping bill, explaining how much welding gas he had needed, I wondered if I had made the correct decision! Still and all, they are very well built and robust. So with plenty of what the Kiwis refer to as bog, plywood on deck and a hefty piece of mahogany below, I fitted the partners.
Had I made the mast and partners out of wood, I should have ended up with overly large structures, so I bit the bullet and asked a local metalworker to make them for me out of stainless steel. Galvanised would have been as good, but they would have to be sent to Christchurch to be galvanised (assuming the works had survived the earthquakes) which I reckoned would cost almost as much as the extra expense of stainless. When Bob presented me with the heart-stopping bill, explaining how much welding gas he had needed, I wondered if I had made the correct decision! Still and all, they are very well built and robust. So with plenty of what the Kiwis refer to as bog, plywood on deck and a hefty piece of mahogany below, I fitted the partners.

Now I had to line up the step. I dithered and measured and worried and fretted. Finally I got the whole stub of the main mast and stepped it through the partners and marked as well as I could where the step should go. The mast seemed to have an excessive forward rake, but I took photos and measured the angle and it seemed to be about 6º. With a bit of help from a neighbour, I got the heavy tube out again and started another round of fretting and worrying: the marks I’d made didn’t match up with my measurements. I faffed about for another couple of days before forcing myself to get on with it and bolt the step down. This, in itself, was a bit of a mission, because a previous owner had added some trimming ballast just where I wanted to fit my step and these random-shaped pieces of lead were very firmly secured with Sikaflex. Eventually, I filled in the gaps with (huge amounts of) epoxy until I had a solid layer to set bolts into. Using the Gougeon Bros methods, I then drilled oversized holes and set greased bolts into these, held in place by the step itself (also greased). When the glue set, I backed the bolts out and cleaned up the step. Then I spread Simson’s Marine Glue and stuck the step down, replacing the bolts.
This done, I brought the topmast out of the shed and spread generous amounts of Simsons over the butt. Using a couple of pieces of copper tubing as a roller, I moved it into the alloy base, wedged securely on the pontoon. In order not to upset the Management I had to get it into the boat quickly. By this time Dick had left for Australia, so once again I roped in the neighbouring boat owner and several other of my strong and/or willing friends. Bruce moved his boat alongside Joshua, and we used his halliard to get things started.

As La Racina is considerably smaller than Irene, we needed far more brute force and bad language, but at last we had the heel of the mast over the hole and quickly slacked away a little on the halliard. More pushing and pulling on deck and then Bruce and I went below to haul the heel back, that was inclined to sit on my bunk. Once it was past the half bulkhead, it gave up the fight and as it was slowly lowered, moved gradually down and into its step. To my profound astonishment, I might add. To the sound of much rejoicing, we released all the lines, I tapped in some temporary wedges and we all stood back to admire The New Mast. I was rather proud of it.

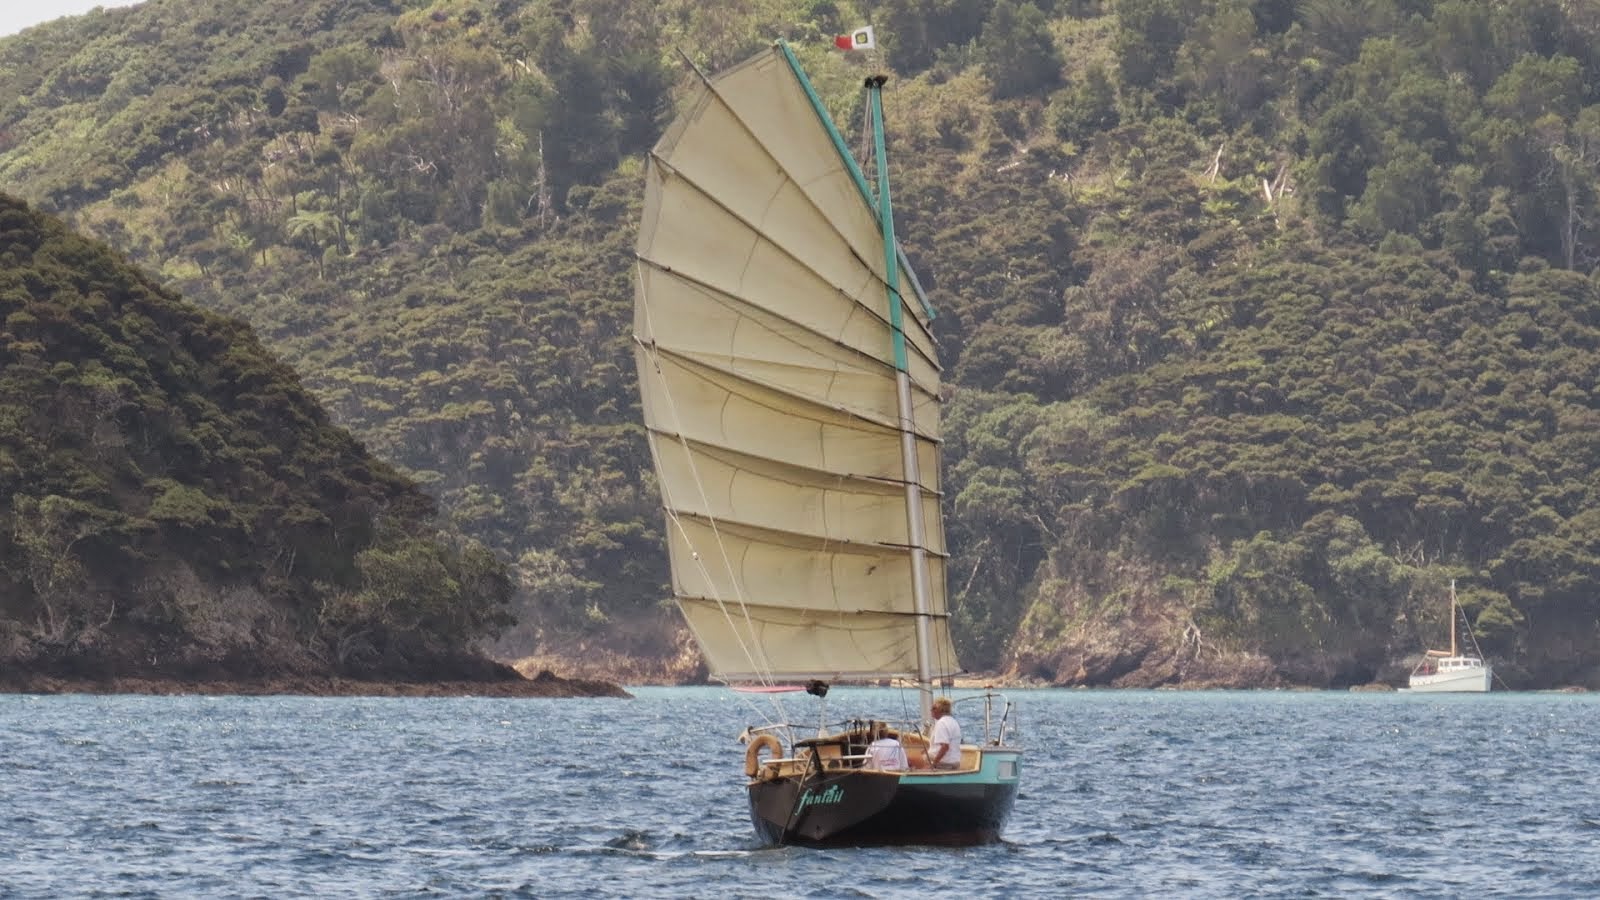
Now we came to the really exciting bit – bending on the sail. A friend came by as I was feeding battens into their pockets and offered to help. He was amused by my refusal and explanation that I was really enjoying doing it all on my own. I had a lot of fun playing with new rope, knotting and whipping. There is plenty of string on a junk and my cambered sail required some lines I hadn’t used before. There was a natural tendency for the folds to hang in diagonal creases and it took a fair bit of time to remove these. But finally I felt all was ready for a trial sail.

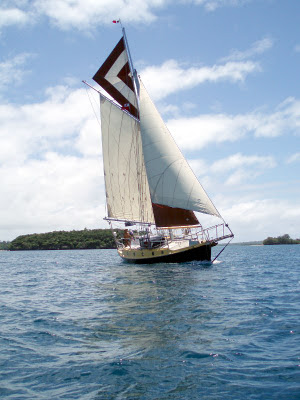
On a calm morning in early April, I started the motor, cast off the lines and chugged out of my marina berth. I turned up the harbour and with the last of the land breeze, shut off the engine and hoisted sail, ghosting through the marina and its rows of silent boats. Once in the Haven we were heading into the little breeze and the boat seemed to take herself to windward quite satisfactorily. We went through the entrance and out into Tasman Bay where the new sea breeze greeted us. As she lifted to the swell coming down from Cook Strait and heeled to the increasing wind I looked up at the lovely sail, thrilled at what I had created. I tacked and gybed, with nothing to do but move the tiller across. I dropped reefs and shook them out again. I felt in control and confident. I was ecstatic. The great fan rose above me and her new name was obvious: like a little bird, she ducked and swooped over the water. The transformation was complete and Joshua had become Fantail.


31 comments:
Annie,
great name great rig! Well done. Please do let us have more photos with a bit more breeze in the sail AND lots of your impressions and observations about how it sails and handles. Looking forward to seeing the hull in its new livery too.
best wishes, Paul
paul at eco-solutions dot org
Hi Annie,
I enjoy reading of your adventures, you seem to cut through all the "bs" an get right to the point. It is in this respect you remind me of my grandmother who could always see the practical side of an issue.
So Joshua is now Fantail, I have been sold on junk rigs since reading VOASI, I just don't have a boat to rig as one. Apparently some of us have large outgoes to coincide with our small incomes. Something my wife fails to comprehend. I have even considered rigging my bicycle as junk, but I figure if I zigged instead of zagged I could be injured severely.
A question I have is the purpose of the lens, are they supposed to improve performance? If so, can you tell a difference? It is just a matter of time before I acquire a sailboat and when I do, it will be rigged as junk.
Sincerely,
Wayne
Your blog said to include our email so here it is fixin2sail@yahoo.com
It looks awesome! Just like it belonged there all the time!
Looks fabulous Annie, looking forward to hearing more on how the new sail works. How does it compare to the burmudan rig? Is there much difference to windward in light breezes and strong ones compared to burmudan? Bet it is a lot easier to handle and to reef!! Are you please with the camber?
regards
Paul
paul/at/eco-solutions/dot/org
Paul - more to come :-)
Anonymous - please leave your name. JR bike would be cool, but yes, a bit dangerous! Yes, the lens adds camber and therefore improves performance. Of course, I can't compare what Fantail sails like with her cambered sail compared with a flat sail, but I have to say she sails really well: better on all points of sailing apart from close-hauled and at least as well close-hauled as she did with Bermudian rig.
Overall I'm thrilled with the new rig.
Annie, great to see that head-on photo with the cambered sail. Looking forward to further photos and impressions when you get the time.
regards
Paul
paul/at/eco-solutions/dot/org
Annie I've been a fan since VOASI
how does she self steer and how does she handle in close quarters?
Paddlevan
Paddlevan (at) gmail (dot) com
Nice article on sail boat, I look forward for more about sailboat. Thanks for sharing.
Great write-up, thank you Annie.
I'm inspired by your mast. I have been getting quotes for wood, aluminium, steel, fibreglass and carbon - all of them breathtakingly expensive.
But like you, i can get 6m of ally tube for under $500. And though i don't have the space to build a 10m mast, i think i can find room to work up 4m of mast.
My boat is a 28 foot long-keeled GRP sloop made in Oz in 1974.
I reckon she's perfect for a junk, and have been a fan ever since VOASI. Then i went on the JRA rally in 2008 aboard Robin Blain's boat, and was hooked even more.
Cheers, and thanks once again for the inspiration.
Matt
matt at waite dot net
Hi Annie; Thank you for this great article describing an useful project where resources are stretched. I see I have missed many life events between VOASI and the current article. Please write more!
Hi Annie,
I have been reading about junk rigs I own an H28 which hardly goes out due to reluctant family so being able to sail single handed - safely. I am impressed with the work you put into Joshua.
Do you know of ant links to dimensions for different sized vessels?
Regards
Tom
Hi Tom
Go to the Junk Rig Association website where you will find heaps of information about boats that have been converted to junk rig. I'm not sure that anyone has done an H28, yet, but there are plenty of a similar size.
HI Annie,
Love your books, your Fantail, your approach overall. Many of us (your "fans"?) have likely sailed most of our lives, but you, though saying you may not be much of a sailor, have shown everyone what a sailor really is. You got, and still get, it done. And show everyone that it can be done at a very modest cost.
Fred, Long Island, NY, USA
I see there are one or two comments here that I haven't replied to. It took me a while to work out how to do it!
Wayne asked the purpose of the lenses: well they are to provide the camber. Can I notice the difference? No, because I never sailed with a flat junk sail on the boat, but Alan, who converted Zebedee from flat sails to cambered ones most certainly notices the difference.
How does she self steer and handle in close quarters? Very well. In fact on most points of sailing - assuming a flat sea - I can leave the helm for a minute or so at a time, to go below to check the chart or put the kettle on, etc. The wind vane is great. I usually sail on and off my anchor, which tells you how she sails in close quarters.
Fred: I was touched and delighted by your comment. I reckon I have such a wonderful life that it's great to be able to share it with people.
Kia Ora Annie
what a wonderful story.
Fantail looks so 'right' with the rig.
A couple of questions if you don't mind?
What did you make your battens from?
and, could you tell me where you sourced the aluminium tube for the mast? (I am also in NZ and my google searches don't seem to come up with anything 6.00 x 150mm)
thanks
Ian
Hello Annie,
Greetings from British Columbia, where of course it's the other side of the year relative to NZ.
Just reread "Voyaging on a Small Income' and your article in Good Old Boat on the creation of the junk rig for Fantail. Great writing--has me stirred me to make my own boat more user-friendly. Mine's a home-designed and -built 11M, 10-ton double-ender, presently a lug-rigged ketch with 850' area with sails that can be set up either dipping or standing. I chose to go that route after initially planning to junk rig, because the quote I received for a sailmaker to cobble a set of sails was so much steeper for the junk version. I'm encouraged by your efforts to go ahead and make my own. With that in mind, I'd be very interested to know how yours has worked out now that you've had it for a while. For instance, are you happy with the cloth you used? Do you think the lens-shaped panels were worth the effort and design complication? Do you think that having a single sail is preferable to, say, the cat-schooner arrangement you had on 'Badger", or would you ideally have multiple sails/masts? Your version of the junk sail is certainly beautiful and appears to stand well. Any other advice you'd care to relate??
Keep up the writing--makes us all aware that we're not alone in our craziness!
Nicol Warn (nwarn@telus.net)
Hi Ian
I made my battens from T6 aluminium. Quite difficult to get here, so you may need to go a size up. If you join the Junk Rig Association, you will find a lot of information about this sort of stuff. It's only about $15 for the basic membership, but I recommend you going for the $50 choice, which give you 3 high-quality paper magazines per annum. While I am a fanatic of my e-reader, magazines just don't work on a computer. You want to flick back and forth, compare the photo in Issue 58 with the one in 64, show them to friends, scale off drawings, etc.
What size boat is it that you are thinking of rigging? 6m are long battens - the longest usually available is 5m. If you need something longer, there's a lot to be said for putting in a wooden plug at either end to bring them to length. This also makes it easier to attach the sail.
We have quite a few members in NZ, so you might find someone in your area.
Annie
That is one great looking sailboat, Annie. I think it is a huge improvement on the original. When can you come and do mine???
Hi Robin
Well, if you really like her, you can come and buy her! i am building another boat - also 26 ft, but with shoal draught so that I can properly explore my chosen cruising ground, here in New Zealand. I'm asking $23,000 for 'Fantail' and for that you get a fully-functioning, very attractive little cruising home.
Annie
Can I part exchange my Westerly Centaur (26' LOA; 1m draught)? I have already threatened to sail it across the Atlantic - so a bit further would be OK I suppose.
Hi Robin: I'm afraid your Centaur won't tempt me. I want another wooden boat. But don't let that stop you sailing across to NZ, selling the Centaur and then buying 'Fantail'!
"Sen McGlinn has left a new comment on your post "The Transformation of "Joshua"":
Dear Annie,
you mention selling Fantail: let me know if she's still for sale. I also have a yarn or two about sailing a 20' shallow-draft junk around the Hauraki Gulf and Bay of Islands, 30 years ago. And how to step a timber mast single-handed without a crane. For your next set of battens: I have used bamboo with great success. I carried a few spares on deck, but never needed one, except as a boat-hook extender."
He also left his phone number, which I inadvertently published and then had to remove!
Sen, I'm afraid Fantail was snapped up. I'd love to hear more about your little junk. I've been thinking about using bamboos, but have not yet found any. Not looked very hard in truth. I believe they need careful drying out before using them, so should really start looking seriously.
Annie
I did not dry my bamboo at all: the bundle of bamboo and sail lies quite flat enough in the cradle of lines when the sail is down. My battens were laced to the sail, which meant they got plenty of air. If you have them in pockets you might want to take them out now and then. But you could also use the pocket just as strengthening for the laces. I burnt holes through the sail with a hot wire, and laced with braided nylon. I also drilled holes in the aft end of the battens for a lace to attach the control lines, which worked fine. A more prudent approach would be to sew a triangular tag on the sail with an eye or lace for the control line, but when I did mine I no longer had a sewing machine. If a batten had split at the end, I had spare battens on board.
My sail was 20m2, I am guessing yours will be 30m2, so everything will have to be scaled up. Northland is an excellent place to get bamboo. Just look for a suitable shelterbelt and ask permission to cut some. The best tool for the job is a battery powered reciprocating saw, and loppers and secateurs to clean up the branches. And leather gloves if possible.
Hi Sen. Thank your for that - all very interesting. Because of the size of my sail, I was thinking of glassing the bamboos, to make them stiffer and to discourage rot. I would be inclined to attach the lines to the bamboos, myself. I don't like them attached directly to the sail, although the ideal, I think, is to attach the sail to the bamboo and then the sheets to the same place so that all three are working together. As you say, there's heaps of bamboo around here - in fact it's an invasive weed - so I shall certainly follow up this idea. Many thanks. Do come and have a yarn if you are in Whangarei!
I doubt the fibreglass would cling to the bamboo consistently enough to discourage rot, and I had no rot problems anyway. Bamboo can be replaced every few years, if you are in the north.
A French junk I met recently, had successfully fibreglassed his battens - with epoxy - which is what gave me the idea. Once I'm living on the boat, it would be more difficult for me to get access to a suitable grove of bamboos, even up here. I want to keep maintenance down to a minimum and also like to try out inexpensive ideas that last, for other people to use.
If you are still in Whangarei or BOI I would love to meet you. We are now the proud owners of a 6.5m Beachcomber, flush deck & bilge keel model, sold without a mast. I will be using your fantail pictures as a model for the rig, although I confess I do not understand at all the purpose of the "camber between the battens", and I fear the actual sewing of such a sail is beyond me. But that's for later; first I need the mast, then I will know what the sail can be. Do you have a source for the aluminium mast?
Hi Sen. I am building my new boat in Norsand Boatyard in Whangarei and will probably be here for a couple of years, yet. The Beachcomber looks like a nice, roomy little boat and the twin keels should be perfect for exploring around Northland.
The camber between the battens is to give some shape to the sail. If you find the thought of sewing a shaped sail a bit daunting you might prefer to put a joint in the battens instead. David Tyler has done this many a time and there is quite a lot about articulated battens on the Junk Rig Association website.
Sewing a flat sail is actually terribly easy and nothing to be frightened of. My friend Alan is based in the BOI, sailing "Zebedee" and has made several sails. I'm sure he'd be only too happy to talk to you about it, if you were to contact him. You can find his details in the membership list.
As for the mast, I made - and am making - a hybrid mast with alloy for the bottom and douglas fir for the top. Ullrich Aluminium provided the tube. For a small boat, you might be able to find a flagpole to suit. Again, heaps of advice available on the website. You can also investigate carbon-fibre reinforced fibreglass, but that will be quite expensive.
Best of luck
Hello Annie,
Great job of the junk rigged transformation.
I would like to know if this kind of sails can have good results to go windward ?
I suppose that the performance are often lest good than a bermudian rig.
Maybe it depends also of the form of the profile, more or less curved, of the hull/keel forms, or others things.
Thanks if there is a reply,(sorry for my average english, i'm french)
Fair winds
Kio
Indeed these sails can go to windward. Fantail, with her cambered sail went better than she had under her bermudian rig, with its poorly-setting roller furling headsail. However, you do need to have either camber in the sail, or articulated battens for the best result to windward. As soon as the wind is free, she will sail at least as fast as her sister and running will outperform any other boat, that isn't flying a spinnaker!
Of course, if you put junk rig on a boat that doesn't sail well under bermudian or gaff rig, it won't sail well under junk rig. Don't be mean with the sail area - the rig is so easy to reef that you don't need to worry. If you remember that bermudian rigged boats set big sails if they really want to sail in light winds, you will realise that you need to build this in to your junk sail(s).
Post a Comment